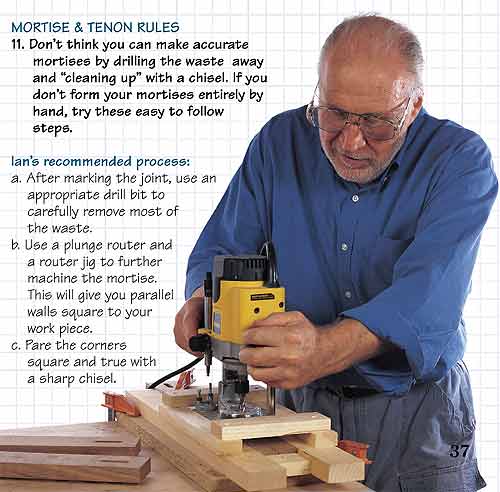
|
| |
". . .if the doors are fairly large (especially if the panel is glass), then you're better off with a stronger frame. And in this case, a
"haunched mortise and tenon" is a good choice."
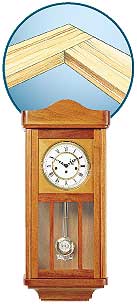
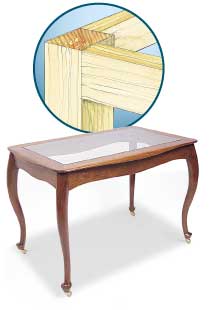
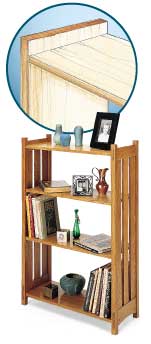
Many of the book cases suggested on this site involve making panel doors,
flat panel, glass panel, or frame and panel construction for the sides and/or
back. The article below is an excellent tutorial on how to make extra strong
panels using mortise and tenon joinery rather than traditional cope and stick
cabinet doors. Click the link at the bottom for the full story.


America's most popular fully-illustrated woodworking magazine
Haunched Mortise &
Tenon
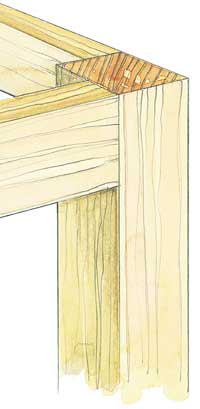
In the frame and raised panel article in issue No. 140, we showed how to build a stub tenon and groove door. This is a quick, easy-to-build frame if you've got relatively small doors, like those on the bookcase.
However, if the doors are fairly large (especially if the panel is glass), then you're better off with a stronger frame. And in this case, a "haunched mortise and tenon" is a good choice. With this joint, there's a haunch "built into" the tenon to fill the grooves in the stiles. This way, you don't end up with any gaps at the top and bottom of the door.
When making a haunched mortise and tenon joint, there's nothing unusual about creating the grooves or the mortises (Steps 1 & 2). Just make sure that the mortises are sized to match the width of the grooves. The tenons are pretty much the same as a traditional tenon too (Steps 3-6). The only difference is the extra shoulder (haunch) on the outside edge.
For the complete article, Click
Here
Here is another great article:
|
| |
A mortise and tenon joint is
nothing more than a square peg in a square hole. The joint is either
stopped or through. The through joint is usually wedged, which makes it
effectively a dovetail joint. Chances are there isn't a house in the
U.S.A. that doesn't have examples of the joint somewhere in its
furniture or built-in cabinets.
In this article I'll describe the three main ways the joint is used.
Since the geometry of any design follows a certain set of conditions, it's
vital to understand that aspect of the joint. I'll also explain how to
design for strength.
In a subsequent article I'll put theory into practice by looking at ways
the joint can be cut and describe, through the making of a simple table,
what you must do before and after cutting the joint.
Although the basic joint is simple, its design details vary in
complexity and sophistication according to the following circumstances:
Do the two or three pieces being joined form the corner of a
two-dimensional frame, as in a door, or a three-dimensional frame, as in
a table? Or, do they form a T-shape, as in a center rail? And finally,
is the joint through or stopped?
Over the years the mortise and tenon assumed a variety of design forms
for a variety of reasons. I've illustrated some of them along with brief
comments. Regardless of their design peculiarities, to work correctly
each must follow the general design characteristics of the more common
forms. In many joinery situations where a mortise and tenon would have
been the traditional solution, two recent alternatives have proved their
worth and may be appropriate. They are plate joints and pocket screws
inserted with the aid of oriented holes.
Two-dimensional
frames
(doors, mirrors, wall panels) |
Three-dimensional
frames
(tables, chairs, beds) |
Carcasses
(bookshelves, etc.) |
|
|
|
|
| Although
these pieces of furniture were built by three different
craftsman and represent vastly different styles, they share the
mortise and tenon as their foundational joint. |
|
|
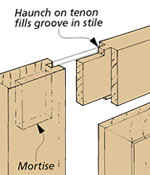
Anatomy of Parts
A key step to understanding
mortise and tenon joinery is knowing the parts, many of which are
derived from human anatomy. The specific name of the mortise/tenon piece
depends upon its function and orientation. The mortise piece is usually
the upright member, such as a stile, leg, or post. The tenon piece is
usually horizontal, such as a rail, an apron, a stretcher, or a shelf. |
Dimensions of Parts
A = Tenon length = Mortise depth
On a stopped joint leave a gap between the end of the tenon and the
bottom of the mortise. The two parts don't need to meet since the end
grain of the tenon isn't a gluing surface, and it's easier to make if
you leave a gap of about 1/16".
B = Tenon width = Mortise length
Make the tenon width to exact fit. If it's too narrow, the tenon may
float and position the rail in the wrong place. For the same reason, don't
crush the edges of the tenon during assembly thinking you are making the
joint tight. More likely you are causing misalignment. The end walls of
the mortise are end grain and therefore not suitable gluing surfaces.
C = Tenon thickness = Mortise width
Make the tenon width to exact fit. If it's too thin, it will likely
float and position the rail in the wrong place.
You should be able to "push-fit" the parts together. A
"push-fit" with squeaky resistance is too tight. Applying glue
will swell an easy-fit joint much tighter. A too-tight joint might split
when glue is added. |
|
Geometry of Parts
 Accurate
joinery, whether cut by hand or machine, is defined by accurate
geometry. Accurate
joinery, whether cut by hand or machine, is defined by accurate
geometry.
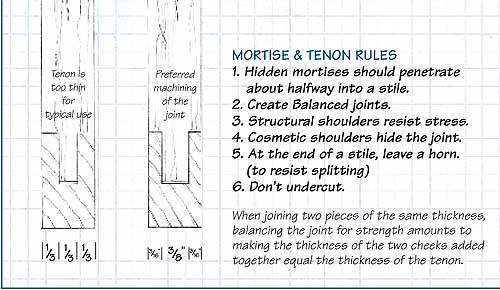
Some authors recommend under-cutting the shoulder to ensure a
tight-fitting joint. My view is -- don't. First, what is undercut?
85°? 70°? Second, how do you measure it? Third, if you can
undercut consistently, its stands to reason you can also cut square.
The undercut shoulder presents an edge to the stile instead of a flat
face. Clamp pressure easily pushes the edge into the stile, distorts the
wood, and changes the between-the-shoulders distance. Most important,
you also lose the mechanical efficiency of a dead stop.
 Mortise
and tenon joinery is subjected to two types of stress. One type arises
from use, as when we lean back in a chair or push a table to a new
location. The other type arises from wood movement. Wood shrinks and
expands across the grain in response to changing humidity but not along
its length. Mortise
and tenon joinery is subjected to two types of stress. One type arises
from use, as when we lean back in a chair or push a table to a new
location. The other type arises from wood movement. Wood shrinks and
expands across the grain in response to changing humidity but not along
its length.
To cope with both types of stress, we design the joint to be as strong
as possible. Since the configuration and section of the parts being
joined are usually unique, we must design for the job at hand and that
design is based on experience about what has worked before. |
|
|
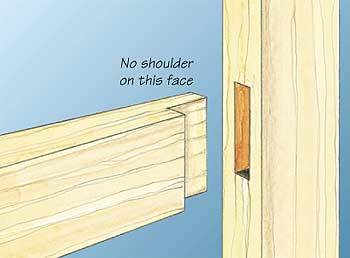 |
| A tenon
without a shoulder on one face of the stock, called a barefaced
mortise and tenon, is not recommended. Try reducing the tenon
thickness to get a shoulder on the bare side. |
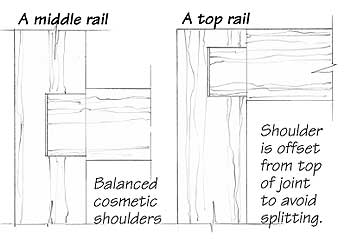
Shoulders
All tenons require shoulders.
There are two types. Structural shoulders resist bending stress.
Cosmetic shoulders hide the joint if the rail shrinks and they hide the
gap presented by a damaged mortise end or a mortise made slightly long.
Cosmetic shoulders need be only 1/8" to be effective.
A tenon without a shoulder on one side is called a barefaced mortise and
tenon. To keep it aligned at the glue-and-clamp stage requires
purpose-made clamping blocks. I don't recommend this configuration. If
at all possible, reduce the thickness of the tenon to get a shoulder on
each side. |
|
Tenon Length, Mortise
Depth
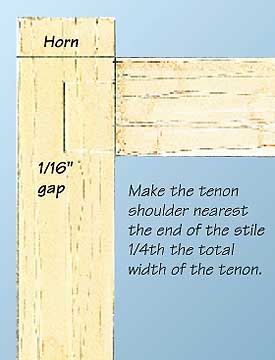 |
| When a
mortise is placed near the end of a stile, an extra inch or so
of material is left to extend past the joint. This horn will be
cut off latter. |
If the tenon is too long, the
joint is under greater stress due to wood movement. Too short, and it
may fail due to too little glue surface. My compromise is to mortise
about halfway into the stile. In narrow stock, go a bit more than
halfway.
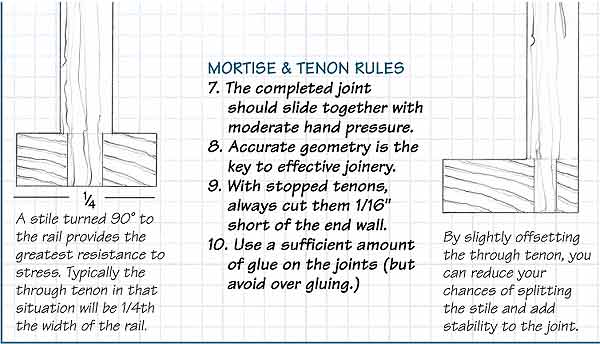
Tenon Width, Mortise Length
If a mortise extends too near to the end of the stile of a corner joint
(often, exactly the spot where you simply need a joint to go), the stile
may split. Therefore, make the tenon shoulder nearest the end of the
stile one-quarter the total width of the tenon. To keep from splitting
the mortise, an extra inch or so (called the horn) is left on the stile.
Once the glue is cured and the job is out of clamps, the horn is sawn
off.
When the mortise is not at the end of the stile, make the tenon the full
width of the rail, less 1/8" at each edge for the cosmetic
shoulder. |
|
Tenon Thickness, Mortise Width
When joining two pieces of wood of the same thickness, divide the
thickness roughly in half to create a balanced joint. For example, if
the wood is 3/4" thick, make the tenon 3/8" thick and each
mortise cheek 3/16" thick. Since each piece has an equal amount of
tissue, each is equally able to resist stress and the joint is balanced. |
|
Loose-tenon Joint
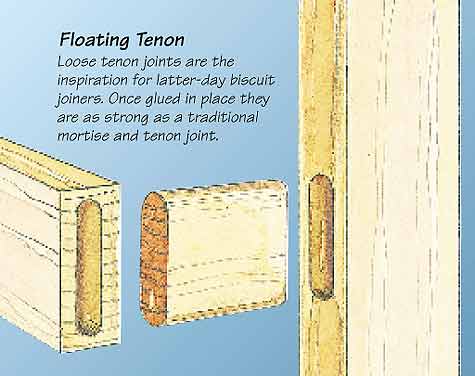 A slot mortiser is a machine
that cuts a mortise into both rail and stile. The two parts are
connected with a third piece made to fit the slot, much like a biscuit
joiner. This joint is called a loose mortise and tenon. You can make the
joint using a plunge router and a single bit, although you will normally
need different jigs to manage the two parts. Once glued, the joint is
just as strong as a conventional mortise and tenon.
A slot mortiser is a machine
that cuts a mortise into both rail and stile. The two parts are
connected with a third piece made to fit the slot, much like a biscuit
joiner. This joint is called a loose mortise and tenon. You can make the
joint using a plunge router and a single bit, although you will normally
need different jigs to manage the two parts. Once glued, the joint is
just as strong as a conventional mortise and tenon. |
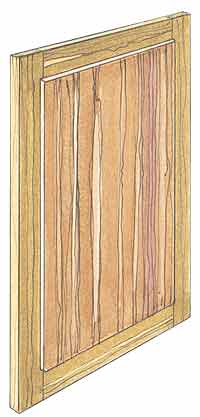
Frame and Panel
Two-dimensional frames with a
solid panel trapped in a groove make a classic frame and panel. This
ingenious construction is not only the foundation of furniture making,
it remains the only method we have for making a dimensionally stable
frame from dimensionally unstable solid wood. The traditional example
is, of course, the frame and panel door. Although with modern material
this door is no longer the most efficient design available, tradition
and a sense of history continue to drive the popularity of this
beautiful cabinet staple. Used in multiples, we can make larger frames,
which, joined at the corners, make storage chests and cabinets.
Three-dimensional frames are used to make table bases, chairs, and the
skeletons of large cases. Three members generally connect, for example,
a table leg and two rails or aprons. In most situations the vertical leg
is more or less square in section, while the incoming rails are flat.
Factors affecting the design of the joint include the width and
thickness of the rails, the exact location of the rails on the faces of
the leg, and complications caused by drawers or doors.
 |
Tables,
chairs and other pieces of furniture are created from mortise
and tenon joints constructed in three dimensions. |
 |
With three
dimensional frame construction, design considerations become
almost infinitely variable. Regardless of how the joint is
employed to create a pleasing appearance, the rules of mortise
and tenon joinery must be observed. |
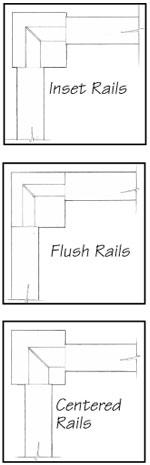
The illustrations above show the rail in three different places on the
leg. Once the joint is glued, the "flush rail" must be made
dead flush by planning -- a manufacturing detail unnecessary with the
inset rail. However, the strongest reason to inset the rail is visual:
the change in level, along with the associated highlights and shadows,
emphasizes the vertical element of the leg.
Note that the thickness of the tenon is increased as it is inset while
the gluing area decreases. In each case the tenon is mitered in the
middle of the joint. Provided the tenons don't touch, you can make the
gap as small as you like. The 1/8" inside shoulder on the flush and
inset rail is enough to do the job.
| Mortise and
tenons and the flat panels easily created by them have long been
the building blocks of solid wood construction. Adjust the
position of the tenon at the end of the rail to logically suit
the location of the rail in the panel.
|
 |
Two-dimensional frames
|
|
|
Underframes
 Underframes
impart stability to a piece of furniture by bracing the structure. They
often do double duty as supports for shelves. Underframes
impart stability to a piece of furniture by bracing the structure. They
often do double duty as supports for shelves.
Where two underframe members meet at a T-shaped junction, you can
increase the gluing area by using twin tenons. If the joint is made
through and wedged, it offers an attractive design detail.
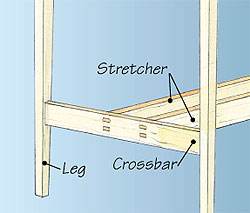 |
Underframes
impart stability to a piece of furniture. On this one the design
not only includes twin tenons, but wedged tenons as well. |
|
 |
| Thicker
stock offers the possibility of creating twin tenons. The key
advantage to this modification is you nearly double the glue
area. |
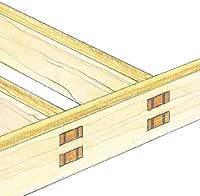
Twin Tenons
When the rail is thicker than 1", you can increase the gluing area
by making twin tenons side by side. The total thickness of the two
tenons is about the same as for a single tenon, but the doubled gluing
area makes for a potentially stronger joint. The figure below shows
typical proportions: the minimum thickness of each tenon is about
3/16", and the space between should be about equal the tenon
thickness. Twin tenons are often used this way in chair making where a
back rail joins a leg.
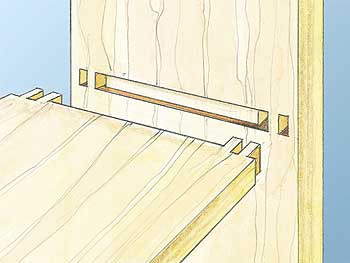
Short twin tenons also occur in carcass sides, where a partition ties
the case together and also acts as a shelf. Make the housing (also known
as a dado) about 1/8" deep between the mortises. A housing between
tenons not only makes the shelf able to bear a heavy load, but it also
flattens any cup in the two boards. Because the tenons would otherwise
be very short, they are usually made through and wedged. Because of the
1/8" deep housing, a 1/2" thick tenon is plenty big. |
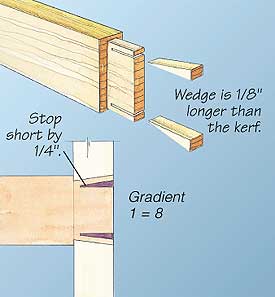 |
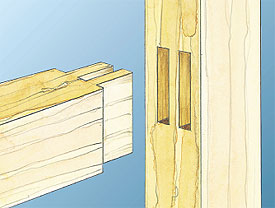
| A
through-wedged mortise and tenon demands precision joinery. The
wedge must thrust the stock against the end grain of the
mortise. Place it the other way and you'll split the wood. |
Gluing and Clamping
A simple yet elegant idea like the mortise and tenon joint can go wrong
at the last moment. In a later article, I'll go through the basics of
gluing and clamping. But for now I must simply say that incorrectly
applied clamps and their critically important clamping blocks, or cauls,
will ruin the best crafted joints in short order. So do not give short
shrift to this last step in making a joint. |
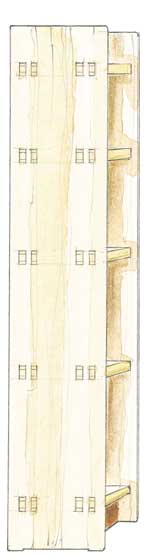 |
Carcasses
One place where through mortise and tenons, and particularly
twin tenons are both strictly integral and visually beautiful.
An additional joinery technique that the author regularly
employs is a conjured housing (or dado here in American). The
1/8'' deep dado shown between the mortise increases the
weight-bearing capabilities of the shelf and flattens and
cupping in the shelf and upright pieces. It also presents a
clean and subtle joint line.
|
In this
example, the author recommends a shallow dado stretching between
the through mortise. |
|
With these few concepts in mind,
it's time to go to your shop and join some wood. Good cutting! |
|
|
Here are some other great links for strong construction joints:
http://www.diydata.com/techniques/timber_joints/mandt/mortise_tenon.htm
|